


Loopback is developed by Strongloop and maintained by IBM. The LoopBack framework is a set of Node.js modules that you can use independently or together to quickly build REST APIs. Heart of Loopback is its model. The application interacts with data-sources through models.
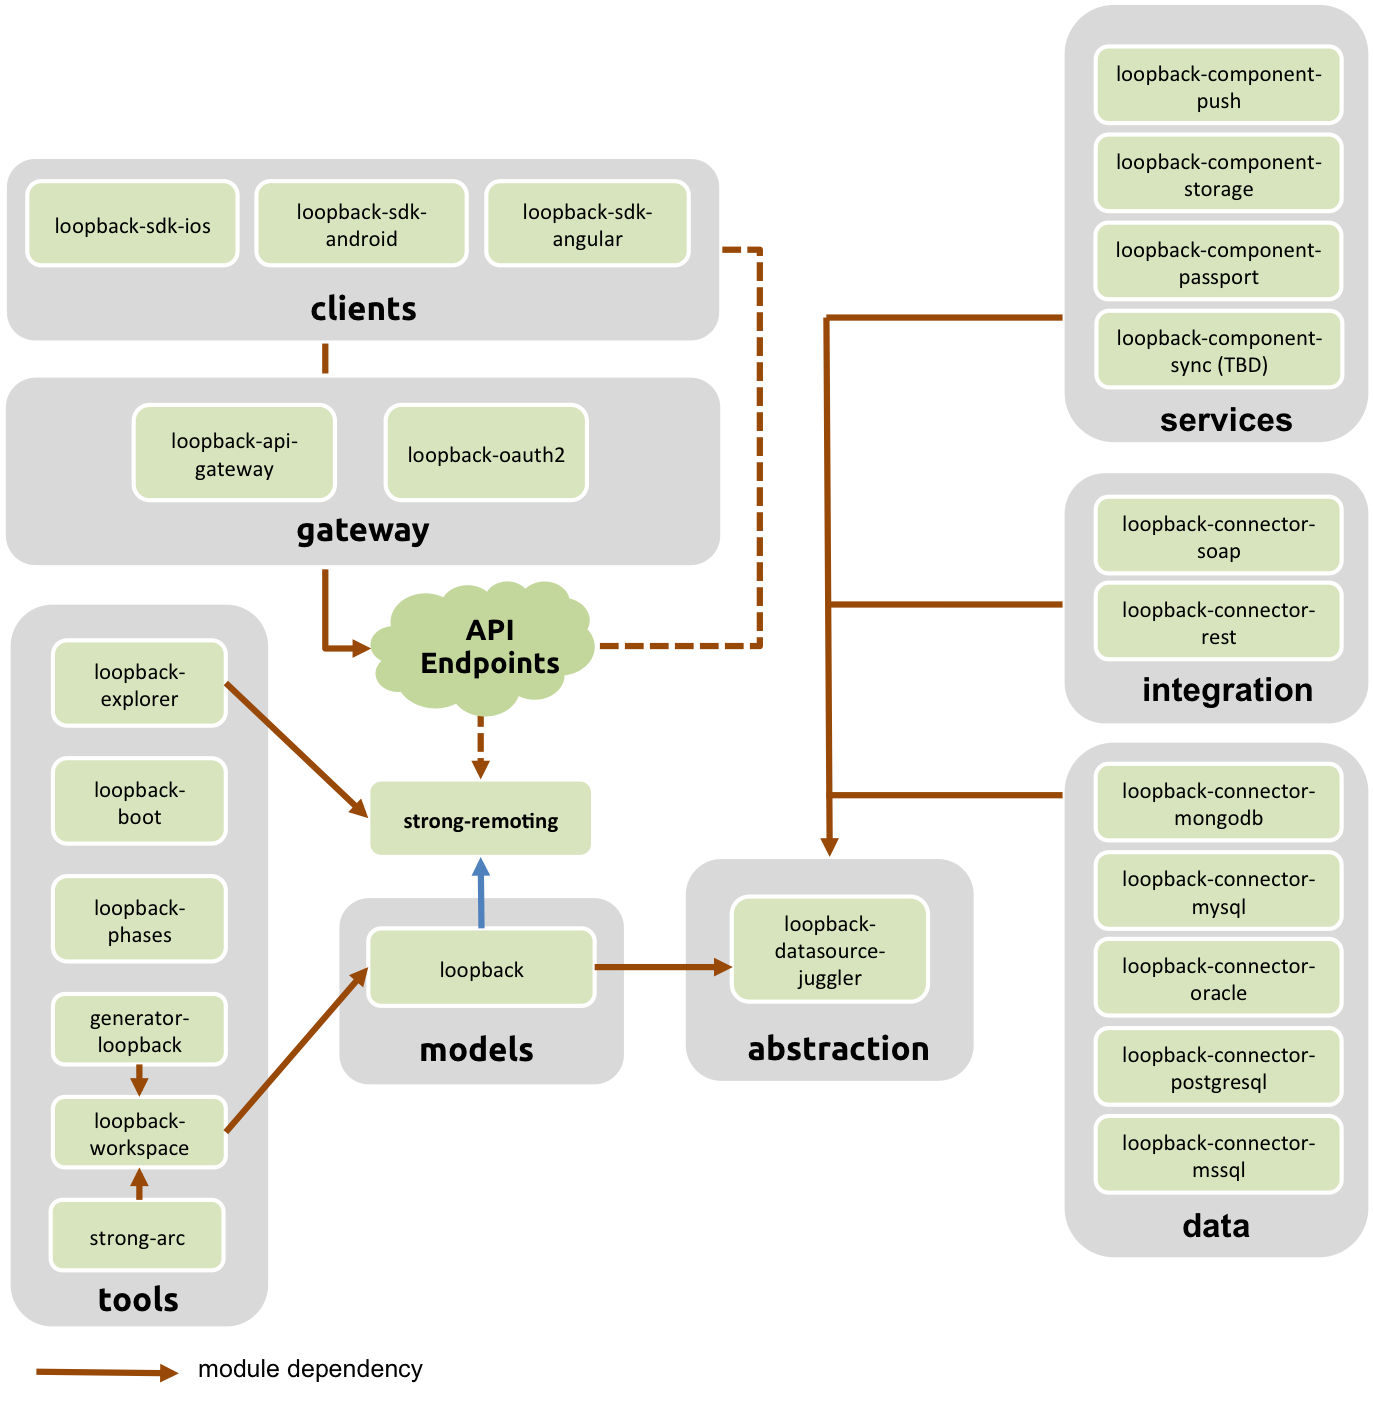
The following diagram illustrates, how loopback works:
Benefits of using Loopback over Express
Loopback has a steep learning curve, on other side Express have an extraordinarily little learning curve.
Loopback has built-in Database integration, whilst you need npm package in Express.
Loopback has built-in models and authentication, API explorer, built-in ORM/ODM with the juggle and various driver and ACL. On the other hand, Express needs a separate npm package for all this.
Node.Js is widely used for quickly wrapping up projects with REST APIs. You have to choose the framework that best suits you and the project.
Installation
Prerequisite
- Node JS
After making sure that you have Node.js installed, run this command:
npm install -g loopback-cli
This installs loopback's CLI globally on your system.
Getting Started
Loopback uses CLI to create an application. Run this command to create a loopback application:
lb
This will prompt you to answer several questions about the application, answer it carefully.
Write your application name, here I'm going to make a Hello World app.
What's the name of your application?
❯ HelloWorld
Enter the directory of your project:
Enter name of the directory to contain the project: (HelloWorld)
Select the loopback version. Currently, the Active version of loopback is 4, but I'm using 3.x LTS.
Which version of LoopBack would you like to use? (Use arrow keys) ❯ 3.x (Active Long Term Support)
Here, you must choose which type of application you want to make.
api-server: It will have a built-in User model with user authentication. Perfect for REST APIs.
empty server: It will only have loopback configured, without any built-in model or data sources.
hello-world: A sample app to highlight application logic with a single model.
notes: A sample project for Notes, having a connection of memory database.
What kind of application do you have in mind? (Use arrow keys)
 api-server (A LoopBack API server with local User auth)
  empty-server (An empty LoopBack API, without any configured models or datasources)
❯  hello-world (A project containing a controller, including a single vanilla Message and a single remote method)
  notes (A project containing a basic working example, including a memory database)
This will create a directory filled with all the node.js module required by loopback and configured loopback dir structure. To run the application, get inside the project dir and run this command:
node .
This will host the application on port 3000 of localhost. go to http://localhost:3000/explorer. It will display the Message API through the loopback explorer. Play with it.
Now, if you want to create a separate REST API, you need to create a model. Run this command to create a model:
lb model
This will also prompt you with some model related questions:
Enter the model name: library
Currently, we haven't defined a data source. The default option is memory db.
Select the datasource to attach library to: (Use arrow keys)
❯ db (memory)
  (no datasource)
Select model's base class (Use arrow keys)
  Model
❯ PersistedModel
  ACL
  AccessToken
  Application
  Change
  Checkpoint
(Move up and down to reveal more choices)
One of the powerful advantages of LoopBack is that it automatically generates a REST API for your model. The generator will ask whether you want to expose this REST API.
Expose library via the REST API? Yes
Loopback let you decide that how do you want to use your model, through server only or through Loopback Client API (common). Here we're using server-side only, so select server and hit enter.
Common model or server only?
  common
❯ server
Every loopback model has properties. That's like fields of database table. Add as much property you want to see in the table. After you finish adding just hit enter with blank and the model is generated for you.
Let's add some library properties now.

Enter an empty property name when done.
? Property name: name
? Property type: (Use arrow keys)
❯ string
  number
  boolean
  object
  array
  date
  buffer
? Required? (y/N)  y
? Default value[leave blank for none]:
It'll create library.json (contains model configurations) and library.js (contains model application logic) file inside /server/models/.
You can simply perform the REST API calls with loopback API explorer.
As we all know, this is a basic setup and it's never enough. What if you want to customize your REST API or add different methods for it? Yep, there is a way to do it with Loopback too. Checkout this post to see how to do it.